
Hi there!
I have received one task recently that basically asked to create 01 instance with 02 containers (Apache and MySQL) and monitoring all using Icinga.
I could create it manually – once Icinga Server was already up and running, but I decided to be little more challenging: What if automate this process using Puppet and centralized the Apache/MySQL logs into a S3 bucket? Wouldn’t be awesome? Yeah.. it would.
So I did it! And I proudly share it with you all. I know that some methods that I’m using may not be the most used one. But I decided to do it by myself instead use external recipes to see how far I could go.
Assumptions
I can assume that you know how to create VPC, subnets and so on and I’m also assuming you know the basic of IAM Roles.
Another thing is that you must to be comfortable with Puppet and your Server must to be communicating with client. There are a lot of tutorials out there explaining how to perform it. It’s not a big deal, for sure.
Existing environment
This is what I already have:
- 01 VPC – 10.0.0.0/16
- 01 Public Subnet with Auto-Sign Public IP
- 01 Security Group allowing: HTTP only to my IP and all protocols only to 10.0.0.0/16
- 01 Puppet Server
- 01 Icinga Server
- 01 IAM S3 Role
- 01 Github Repository
- 01 S3 bucket
Icinga Server
Icinga is an open source computer system and network monitoring application. It was originally created as a fork of the Nagios system monitoring application in 2009.
The install and configuration method can be followed here.
Puppet Server
The install and configuration of Puppet server is quite standard and can be followed here.
On my approach, I’m using Puppet AWS module in order to create/configure instances.
Solution Created
That’s what I’ve made:
Creation of Puppet Manifest to creation of new instances (create.pp)
Creation of script (crossover.sh) to prepare the new instance on the fly doing:
- Update the instances package’s list;
- Install Docker;
- Deploy docker mysql container and configure;
- Deploy apache container and configure;
- Link apache and mysql;
- Pull php files (index.php, db.php, logout.php) from Github to apache webdir;
- Download script (cronlogs.sh) responsible to upload docker container’s log files to S3 and configure it on cron.
Running the Solution
1 – ssh to Puppet Server
2 – Create a new instance calling “create.pp”
ubuntu@ip-10-0-0-22:~$ sudo puppet apply create.pp Notice: Compiled catalog for ip-10-0-0-22.ec2.internal in environment production in 0.02 seconds Notice: /Stage[main]/Main/Ec2_instance[Puppet-Client-1]/ensure: changed absent to running Notice: Finished catalog run in 12.71 seconds |
3 – Following the creation on the console (Optional)

4 – Meanwhile, let’s get the internal instance IP and add it to our Icinga Manifest file (the Icinga Server acting as Puppet Client will push this file, publish to Icinga config dir and reload the service configuration)
ubuntu@ip-10-0-0-22:~$ sudo aws ec2 describe-instances --filters "Name=tag:Name,Values=Puppet-Client-1" |grep PrivateIpAddress "PrivateIpAddress": "10.0.0.231", ubuntu@ip-10-0-0-22:~$ sudo sed -i "s/address.*/address 10.0.0.231/g" /etc/puppet/manifests/site.pp |
5 – Test the new client webserver accessing the PublicDNSName (At this point, both containers should be up and running)
ubuntu@ip-10-0-0-22:~$ sudo aws ec2 describe-instances --filters "Name=tag:Name,Values=Puppet-Client-1" |grep PublicDnsName "PublicDnsName": "ec2-54-175-55-36.compute-1.amazonaws.com", |

6 – After login, you’ll see the database test page

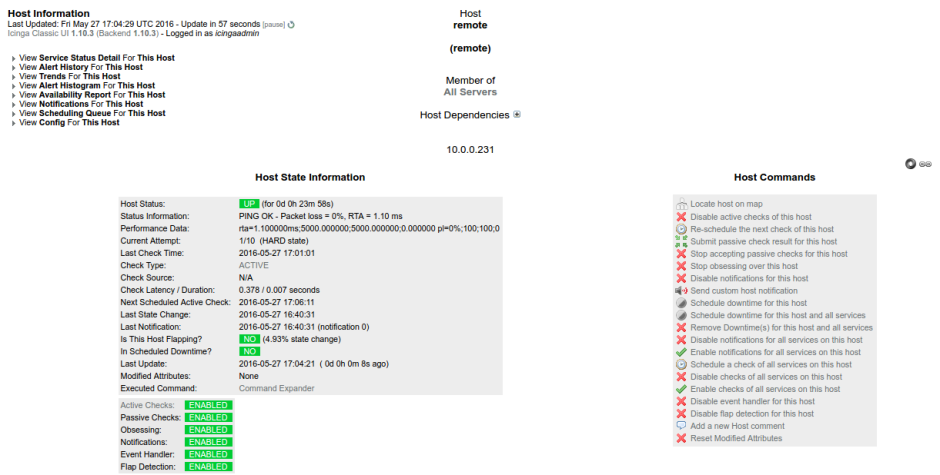
And you can notice Isinga monitoring the new instance automatically

Explaining the Solution
This is the create.pp used by puppet:

Its using an default Ubuntu image and as you can see, it’s sending an script called “setup.sh” as user-data:

The script is self explained. At the end, there is another script called “cronlogs.sh“. This guy is responsible to copy the Apache and MySQL logs from the containers and send to a S3 bucket – that’s the reason to create an S3 IAM Role:

And the last part is the Icinga automatic update. Basically it is only a cfg file where the target ip has been previous changed as I mentioned earlier:

And that’s all.
All of there files (scripts, Puppet recipes, etc) are available on my public GitHub repository.
Test it when you have time, try to have fun and give me some feedbacks!
Cheers!

I don’t see a crossover.sh script on you github. I am trying to reproduce your setup. Thanks. wlasso
You’re right. The correct is ‘setup.sh’. Sorry!